Collision detection
Introduction
In this chapter, we explore some techniques for detecting collisions between objects. This includes moving and static objects. We will first present three “classic” collision tests, and follow them with brief sketches of more complex algorithms.
Circle – Circle collision test
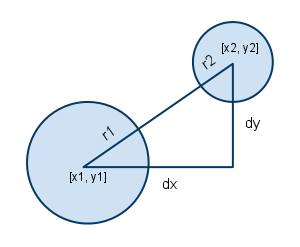
Collision between circles is easy. Imagine there are two circles:
- Circle c1 with center (x1,y1) and radius r1;
- Circle c2 with center (x2,y2) and radius r2.
Imagine there is a line running between those two center points. The distances from the center points to the edge of each circle is, by definition, equal to their respective radii. So:
- if the edges of the circles touch, the distance between the centers is r1+r2;
- any greater distance and the circles don’t touch or collide; whereas
- any less and they do collide or overlay.
In other words: if the distance between the center points is less than the sum of the radii, then the circles collide.
Let’s implement this as a JavaScript function step-by-step:
- function circleCollideNonOptimised(x1, y1, r1, x2, y2, r2) {
- var dx = x1 – x2;
- var dy = y1 – y2;
- var distance = Math.sqrt(dx * dx + dy * dy);
- return (distance < r1 + r2);
- }
This could be optimized a little averting the need to compute a square root:
- (x2–x1)^2 + (y1–y2)^2 <= (r1+r2)^2
Which yields:
- function circleCollide(x1, y1, r1, x2, y2, r2) {
- var dx = x1 – x2;
- var dy = y1 – y2;
- return ((dx * dx + dy * dy) < (r1 + r2)*(r1+r2));
- }
This technique is attractive because a “bounding circle” can often be used with graphic objects of other shapes, providing they are not too elongated horizontally or vertically.
Let’s test this idea
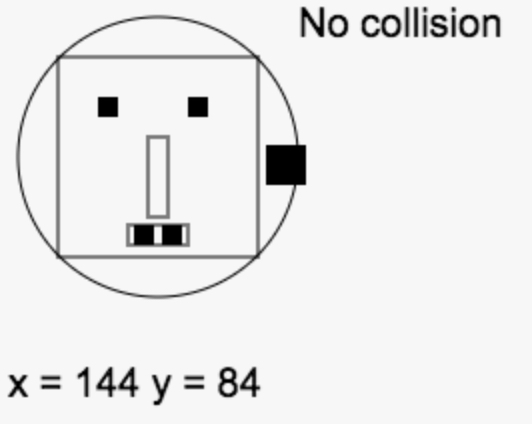
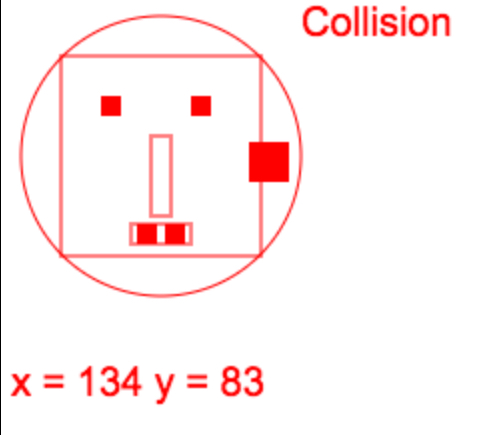
Try this example at JSBin: move the monster with the arrow keys and use the mouse to move “the player”: a small circle. Try to make collisions between the monster and the circle you control.
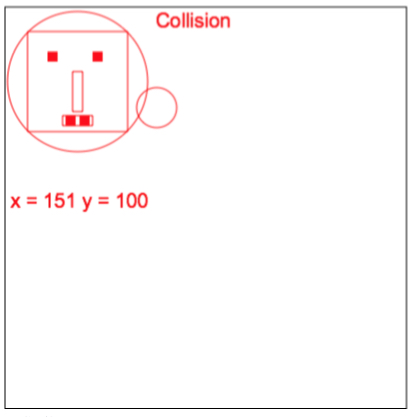
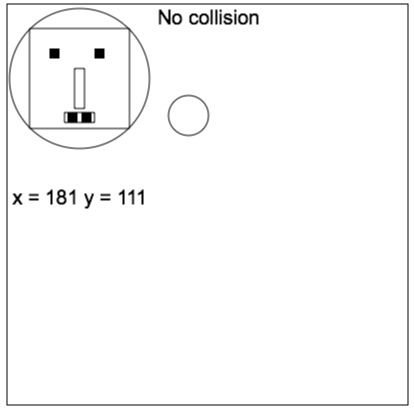
This online example uses the game framework (without time-based animation in this one). We just added a “player” (for the moment, a circle that follows the mouse cursor), and a “monster”. We created two JavaScript objects for describing the monster and the player, and these objects both have a boundingCircleRadius property:
- // The monster!
- var monster = {
- x:80,
- y:80,
- width: 100,
- height : 100,
- speed:1,
- boundingCircleRadius: 70
- };
- var player = {
- x:0,
- y:0,
- boundingCircleRadius: 20
- };
The collision test occurs in the main loop:
- var mainLoop = function(time){
- //main function, called each frame
- measureFPS(time);
- // Clear the canvas
- clearCanvas();
- // Draw the monster
- drawMyMonster();
- // Check inputs and move the monster
- updateMonsterPosition();
- updatePlayer();
- checkCollisions();
- // Call the animation loop every 1/60th of second
- requestAnimationFrame(mainLoop);
- };
- function updatePlayer() {
- // The player is just a circle drawn at the mouse position
- // Just to test circle/circle collision.
- if(inputStates.mousePos) { // Move the player and draw it as a circle
- player.x = inputStates.mousePos.x; // when the mouse moves
- player.y = inputStates.mousePos.y;
- ctx.beginPath();
- ctx.arc(player.x, player.y, player.boundingCircleRadius, 0, 2*Math.PI);
- ctx.stroke();
- }
- }
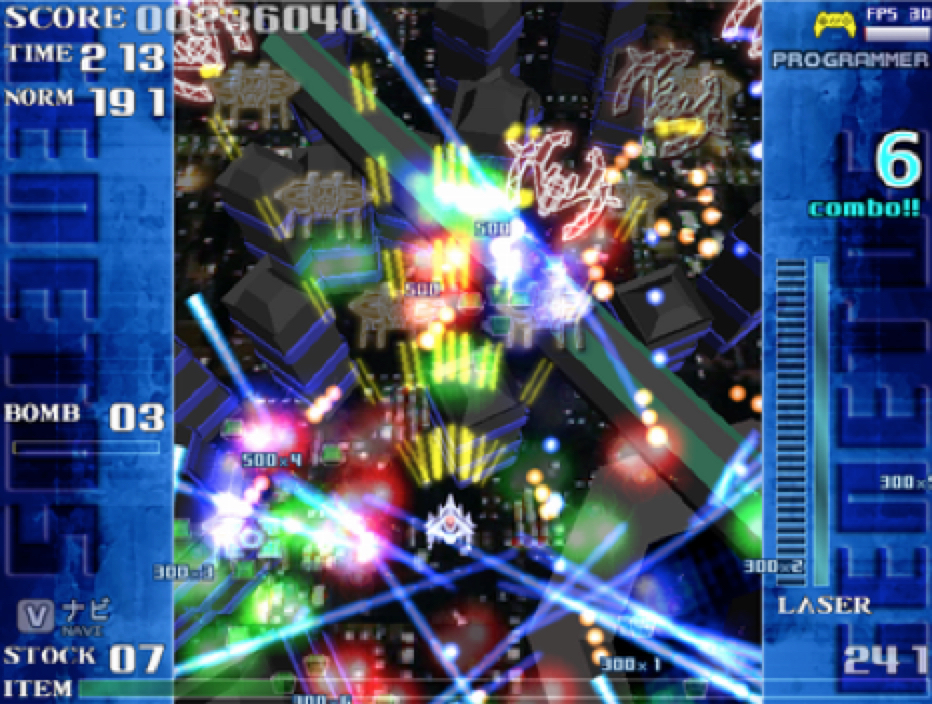
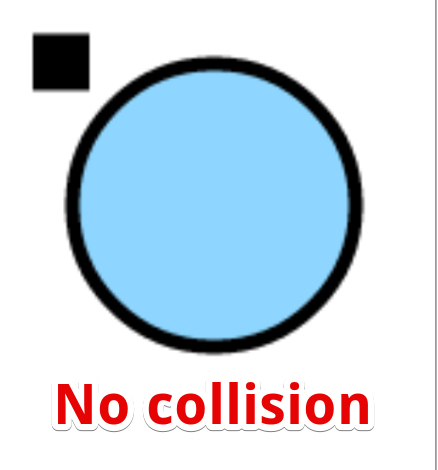
- function checkCollisions() {
- if(circleCollide(player.x, player.y, player.boundingCircleRadius,
- monster.x, monster.y, monster.boundingCircleRadius)) {
// Draw everything in red - ctx.fillText(“Collision”, 150, 20);
- ctx.strokeStyle = ctx.fillStyle = ‘red’;
- } else {
// Draw in black - ctx.fillText(“No collision”, 150, 20);
- ctx.strokeStyle = ctx.fillStyle = ‘black’;
- }
- }
- function circleCollide(x1, y1, r1, x2, y2, r2) {
- var dx = x1 – x2;
- var dy = y1 – y2;
- return ((dx * dx + dy * dy) < (r1 + r2)*(r1+r2));
- }
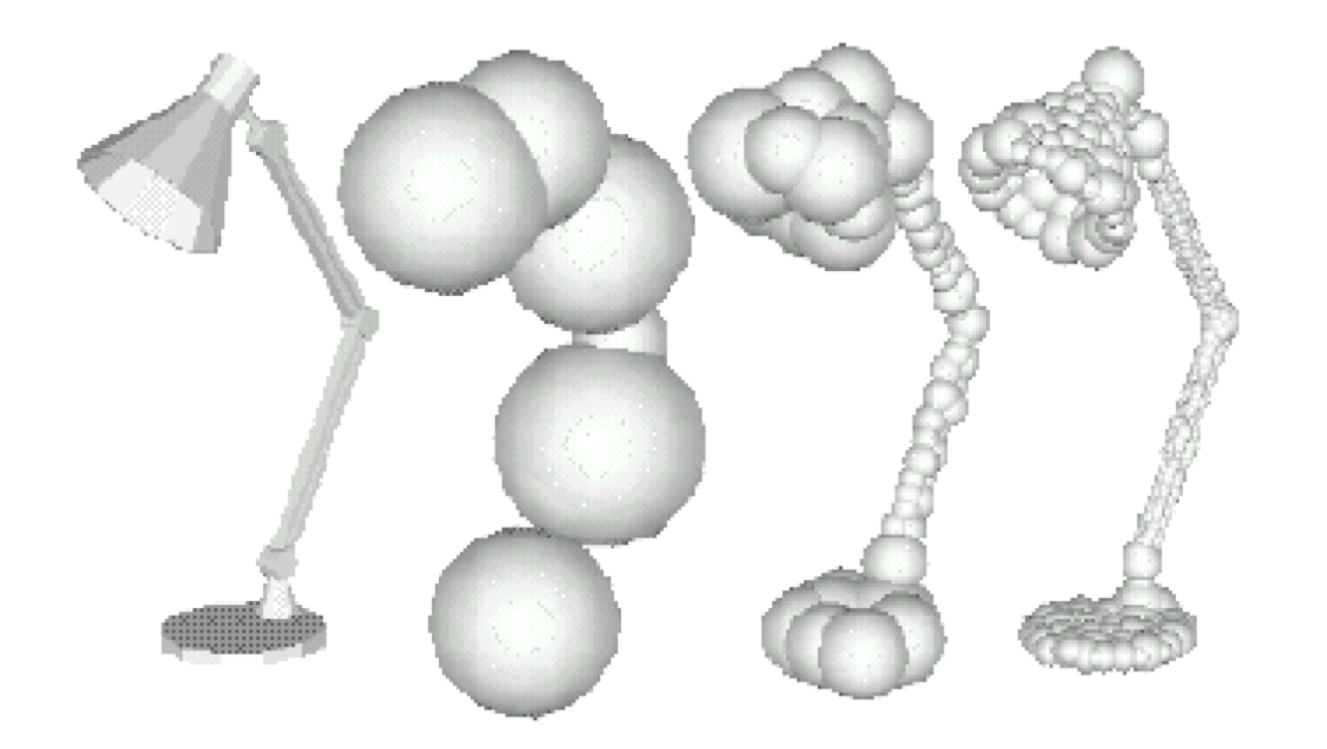
[Advanced technique] Use several bounding circles for complex shapes, recompute bounding circles when the shape changes over time (animated objects)
This is an advanced technique: you can use a list of bounding circles or better still, a hierarchy of bounding circles in order to reduce the number of tests. The image below of an “arm” can be associated with a hierarchy of bounding circles. First test against the “big one” on the left that contains the whole arm, then if there is a collision, test for the two sub-circles, etc… this recursive algorithm will not be covered in this course, but it’s a classic optimization.

In 3D, you can use spheres instead of circles:
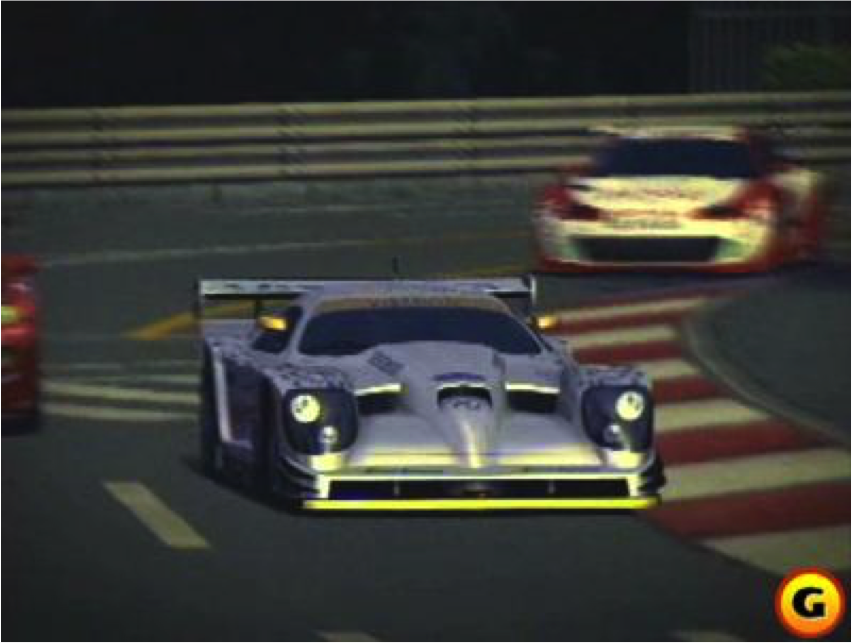
The famous game Gran Turismo 4 on the PlayStation 2 uses bounding spheres for detecting collisions between cars:
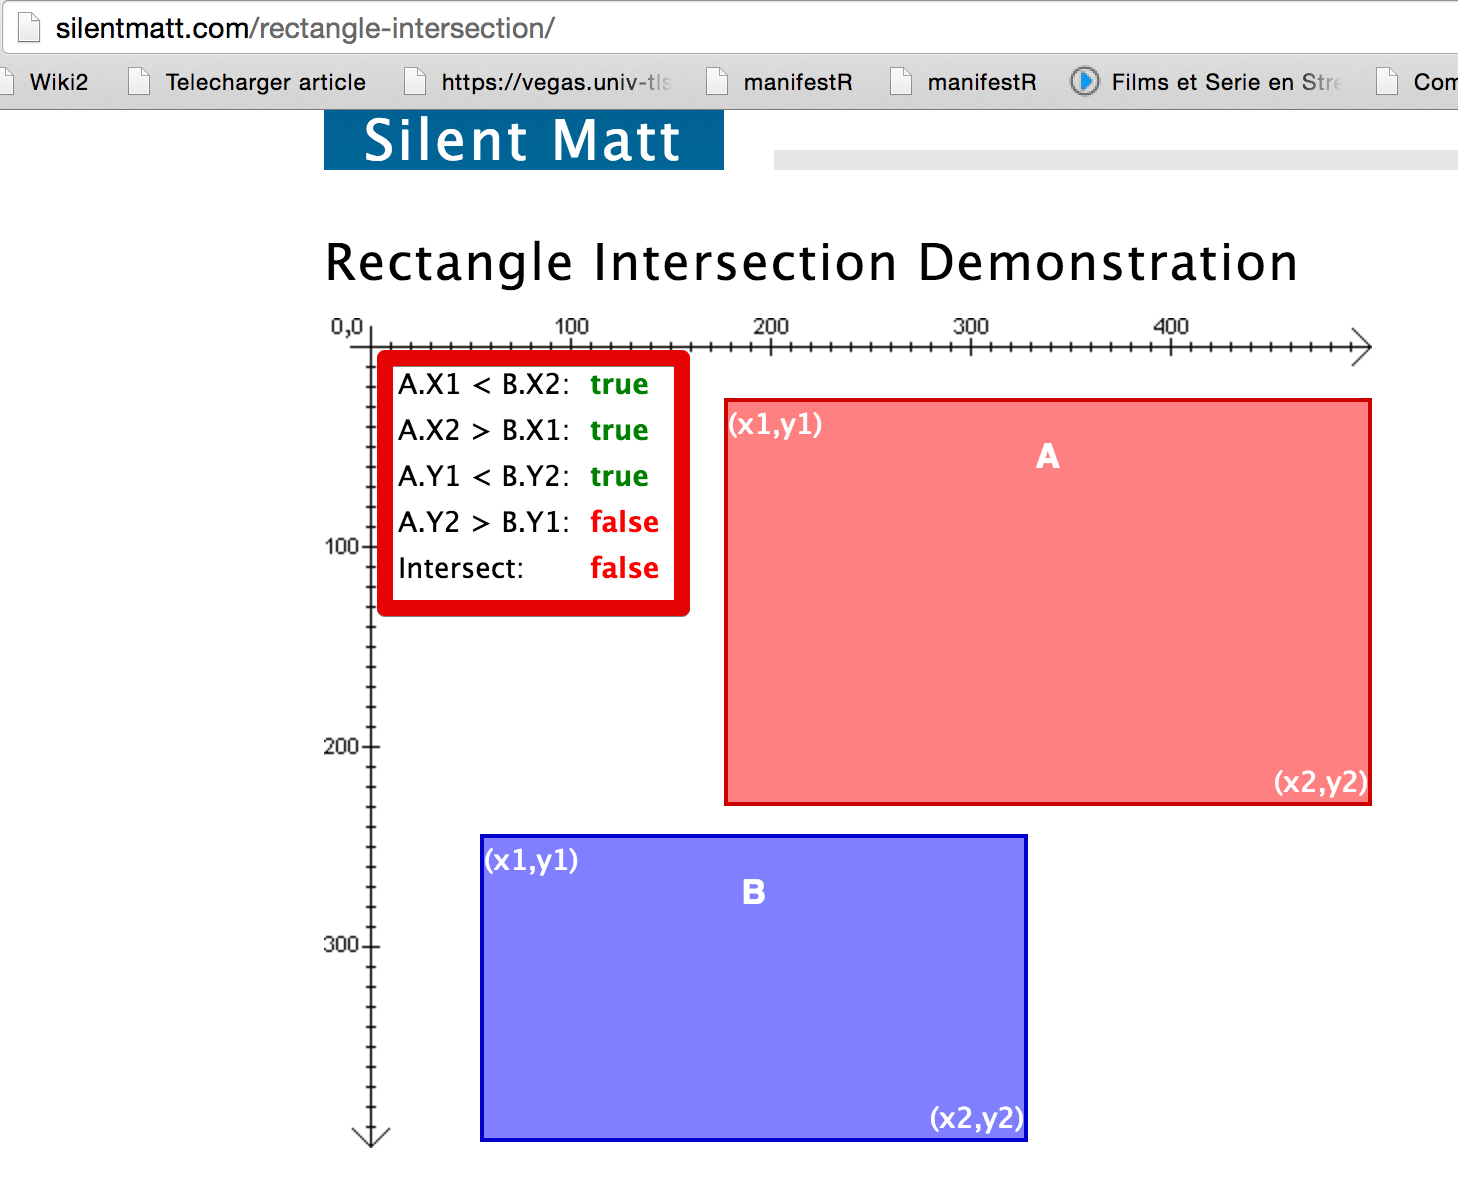
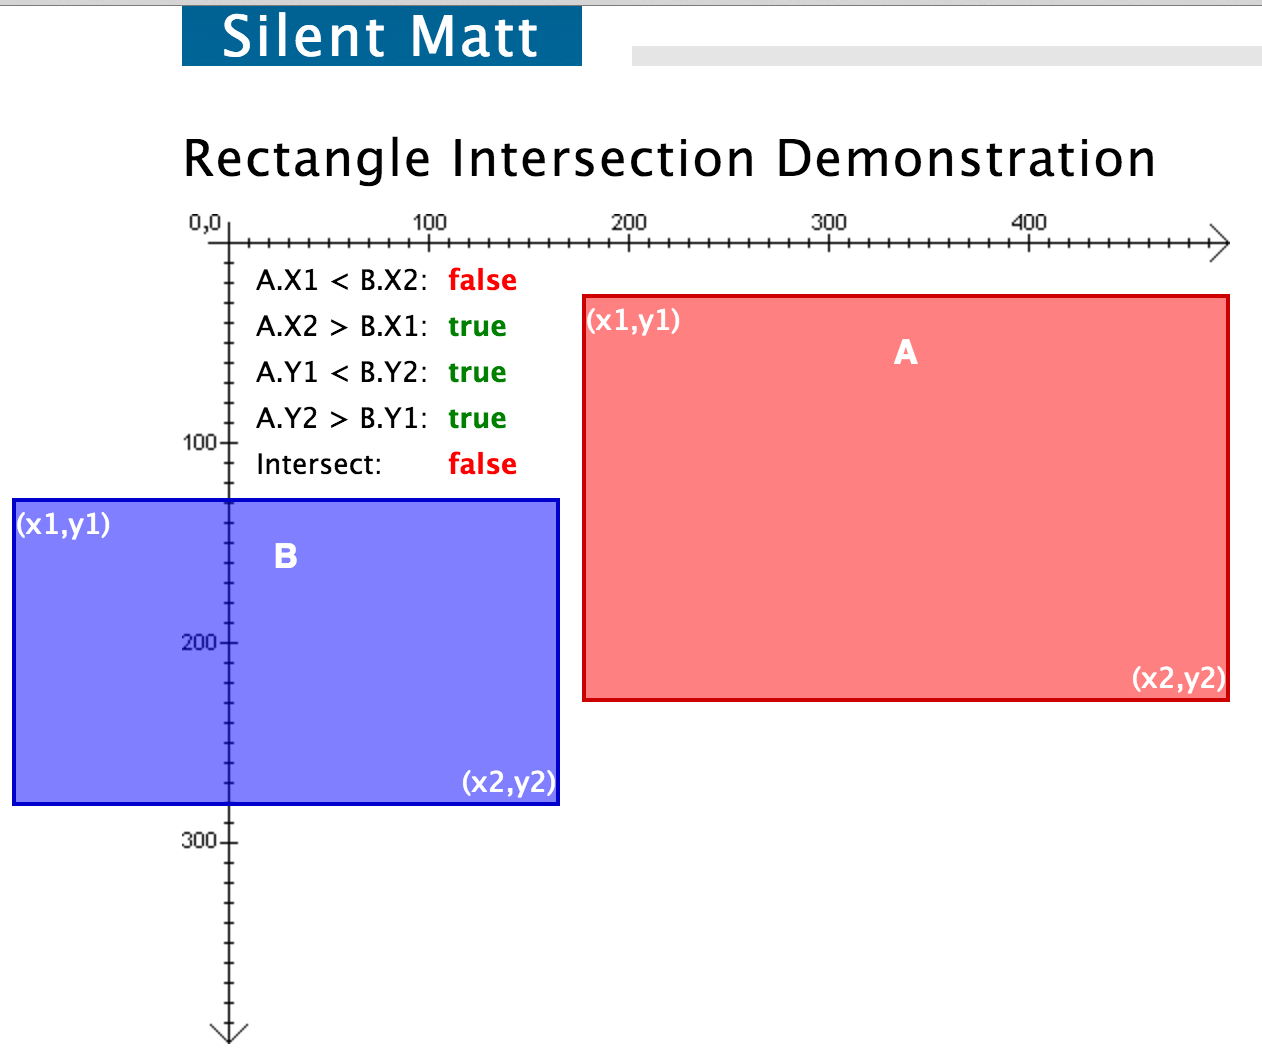
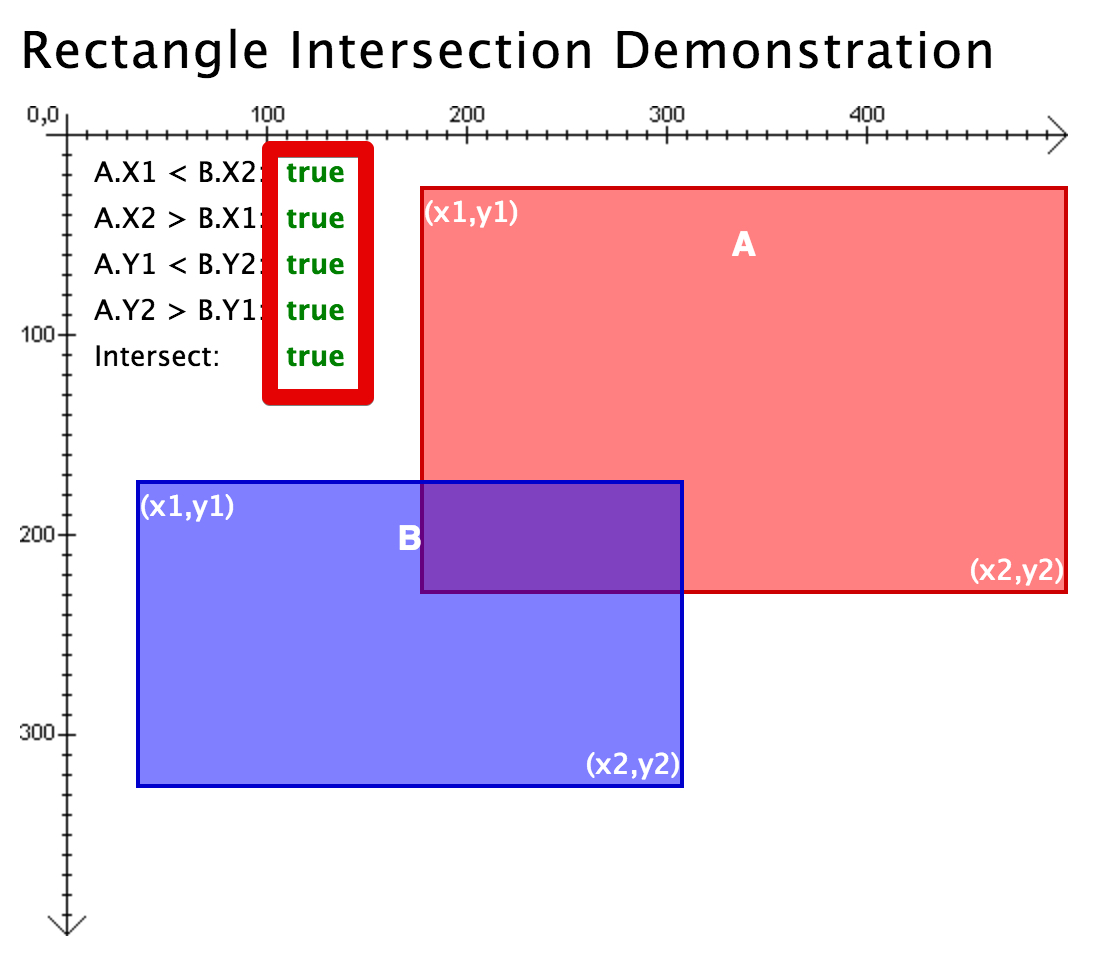
Rectangle – rectangle (aligned along X and Y axis) detection test
Let’s look at a a simple illustration:
From this:
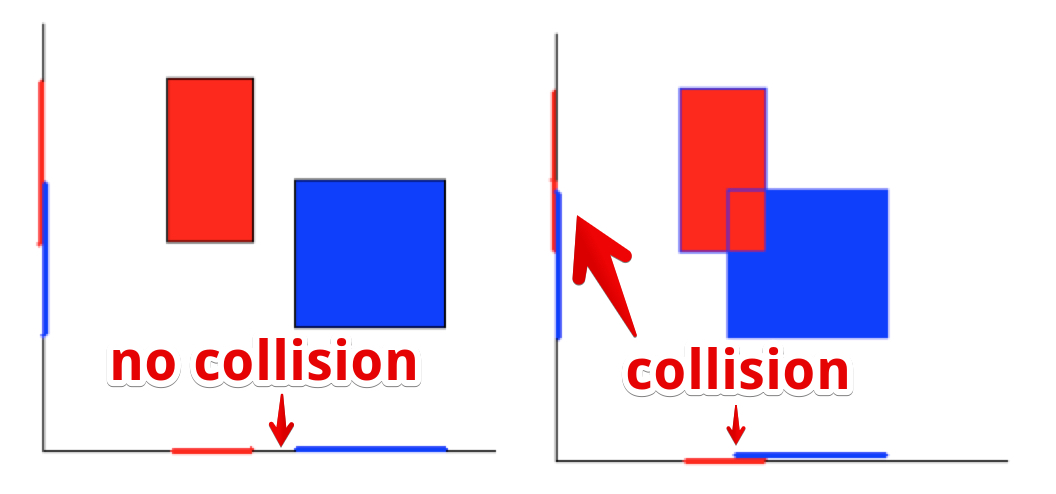
To detect a collision between two aligned rectangles, we project the horizontal and vertical axis of the rectangles over the X and Y axis. If both projections overlap, there is a collision!
Try this online demonstration of rectangle – rectangle detection
1 – Only horizontal axis projections overlap: no collision between rectangles
2 – Only vertical axis projections overlap: no collision between rectangles
3 – Horizontal and vertical axis projections overlap: collision detected!
Here is a JavaScript implementation of a rectangle – rectangle (aligned) collision test:
- // Collisions between aligned rectangles
- function rectsOverlap(x1, y1, w1, h1, x2, y2, w2, h2) {
- if ((x1 > (x2 + w2)) || ((x1 + w1) < x2))
- return false; // No horizontal axis projection overlap
- if ((y1 > (y2 + h2)) || ((y1 + h1) < y2))
- return false; // No vertical axis projection overlap
- return true; // If previous tests failed, then both axis projections
- // overlap and the rectangles intersect
- }
Let’s test this method
Try this example at JSBin: move the monster with the arrow keys and use the mouse to move “the player”: this time a small rectangle. Try to make collisions between the monster and the circle you control. Notice that this time the collision detection is more accurate and can work with elongated shapes.
Here is what we modified (in bold) in the code:
- …
- // The monster!
- var monster = {
- x: 80,
- y: 80,
- width: 100,
- height: 100,
- speed: 1,
- boundingCircleRadius: 70
- };
- var player = {
- x: 0,
- y: 0,
- boundingCircleRadius: 20
- };
- …
- function updatePlayer() {
- // The player is just a square drawn at the mouse position
- // Just to test rectangle/rectangle collisions.
- if (inputStates.mousePos) {
- player.x = inputStates.mousePos.x;
- player.y = inputStates.mousePos.y;
- // draws a rectangle centered on the mouse position
- // we draw it as a square.
- // We remove size/2 to the x and y position at drawing time in
- // order to recenter the rectangle on the mouse pos (normally
- // the 0, 0 of a rectangle is at its top left corner)
- var size = player.boundingCircleRadius;
- ctx.fillRect(player.x – size / 2, player.y – size / 2, size, size);
- }
- }
- function checkCollisions() {
- // Bounding rect position and size for the player. We need to translate
- // it to half the player’s size
- var playerSize = player.boundingCircleRadius;
- var playerXBoundingRect = player.x – playerSize / 2;
- var playerYBoundingRect = player.y – playerSize / 2;
- // Same with the monster bounding rect
- var monsterXBoundingRect = monster.x – monster.width / 2;
- var monsterYBoundingRect = monster.y – monster.height / 2;
- if (rectsOverlap(playerXBoundingRect, playerYBoundingRect,
- playerSize, playerSize,
- monsterXBoundingRect, monsterYBoundingRect,
- monster.width, monster.height)) {
- ctx.fillText(“Collision”, 150, 20);
- ctx.strokeStyle = ctx.fillStyle = ‘red’;
- } else {
- ctx.fillText(“No collision”, 150, 20);
- ctx.strokeStyle = ctx.fillStyle = ‘black’;
- }
- }
- // Collisions between aligned rectangles
- function rectsOverlap(x1, y1, w1, h1, x2, y2, w2, h2) {
- if ((x1 > (x2 + w2)) || ((x1 + w1) < x2))
- return false; // No horizontal axis projection overlap
- if ((y1 > (y2 + h2)) || ((y1 + h1) < y2))
- return false; // No vertical axis projection overlap
- return true; // If previous tests failed, then both axis projections
- // overlap and the rectangles intersect
- }
Many real games use aligned rectangle collision tests
Testing “circle-circle” or “rectangle-rectangle collisions is cheap in terms of computation. “Rectangle-rectangle” collisions are used in many 2D games, such as Dodonpachi (one of the most famous and enjoyable shoot’em’ups ever made – you can play it using the MAME arcade game emulator):
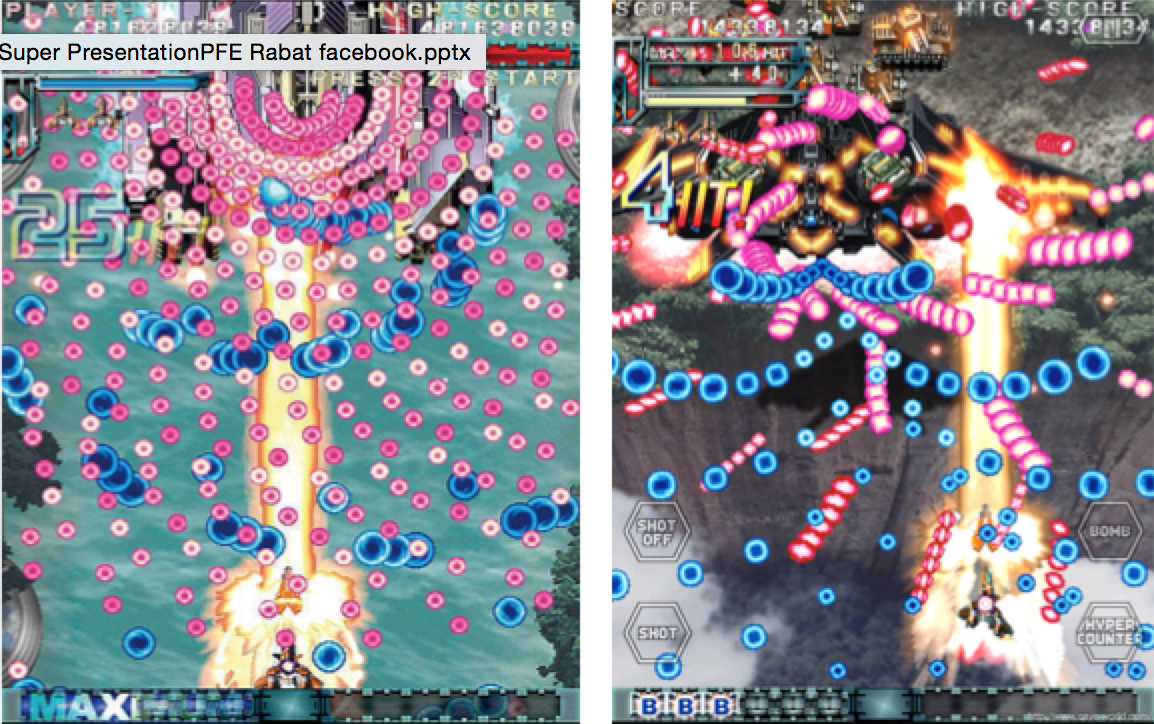
You could also try the free Genetos shoot’em up game (Windows only) that retraces the history of the genre over its different levels (download here). Press the G key to see the bounding rectangles used for collision test. Here is a screenshot:
These games run at 60 fps and can have hundreds of bullets moving at the same time. Collisions have to be tested: did the player’s bullets hit an enemy, AND did an enemy bullet (for one of the many enemies) hit the player? These examples demonstrate the efficiency of such collision test techniques.
Other collision tests
In this section we will only give sketches and examples of more sophisticated collision tests. For further explanation, please follow the links provided.
Aligned rectangle-circle
There are only two cases when a circle intersects with a rectangle:
- Either the circle’s center lies inside the rectangle, or
- One of the edges of the rectangle intersects the circle.
We propose this function (implemented after reading this Thread at StackOverflow):
- // Collisions between rectangle and circle
- function circRectsOverlap(x0, y0, w0, h0, cx, cy, r) {
- var testX=cx;
- var testY=cy;
- if (testX < x0) testX=x0;
- if (testX > (x0+w0)) testX=(x0+w0);
- if (testY < y0) testY=y0;
- if (testY > (y0+h0)) testY=(y0+h0);
- return (((cx–testX)*(cx–testX)+(cy–testY)*(cy–testY))< r*r);
- }
Try this function in this example on JSBin.
[ADVANCED] Collision between balls (pool like)
The principle behind collision resolution for pool balls is as follows. You have a situation where two balls are colliding, and you know their velocities (step 1 in the diagram below). You separate out each ball’s velocity (the solid blue and green arrows in step 1, below) into two perpendicular components: the “normal” component heading towards the other ball (the dotted blue and green arrows in step 2) and the “tangential” component that is perpendicular to the other ball (the dashed blue and green arrows in step 2). We use “normal” for the first component as its direction is along the line that links the centers of the balls, and this line is perpendicular to the collision plane (the plane that is tangent to the two balls at collision point).
The solution for computing the resulting velocities is to swap the components between the two balls (as we move from step 2 to step 3), then finally recombine the velocities for each ball to achieve the result (step 4):
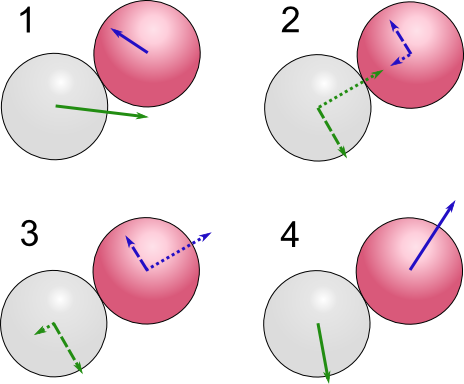
The above picture has been borrowed from this interesting article about how to implement in C# pool like collision detection.
Of course, we will only compute these steps if the balls collide, and for that test we will have used the basic circle collision test outlined earlier.
To illustrate the algorithm, here is an example at JSBin that displays the different vectors in real time, with only two balls. The maths for the collision test have also been expanded in the source code to make computations clearer. Note that this is not for beginners: advanced maths and physics are involved!
To go further… video game physics!
For the ones who are not afraid by some maths and physics and would like to learn how to do collision detection in a more realistic way (using physics modeling), we recommend this tutorial, that is the first of a three-part series about video game physics.
