Drag and drop images with thumbnail previews
This time, let’s reuse the readFilesAndDisplayPreview() method we saw in the File API chapter in the HTML5 Part 1 course.
We have reproduced the example here – please review the source code to refresh your memory (click on the JS tab or look at the example at CodePen).
Click the “Choose files” button (an <input type=”file”> element), select one or more images — and you should see image thumbnails displayed in the open space beneath it:
Source code extract (the part that reads the image file content and displays the thumbnails):
- function readFilesAndDisplayPreview(files) {
- // Loop through the FileList and render image files
- // as thumbnails.
- for (var i = 0, f; f = files[i]; i++) {
- // Only process image files.
- if (!f.type.match(‘image.*’)) {
- continue;
- }
- var reader = new FileReader();
- //capture the file information.
- reader.onload = function(e) {
- // Render thumbnail.
- var span = document.createElement(‘span’);
- span.innerHTML = “<img class=’thumb’ src='” +
- e.target.result + “‘/>”;
- document.getElementById(‘list’).insertBefore(span, null);
- };
- // Read the image file as a data URL. Will trigger
- // a call to the onload callback above
- // only once the image is completely loaded
- reader.readAsDataURL(f);
- }
- }
At line7, there is a test that will avoid processing non image files. The “!” is the NOT operator in JavaScript. The call to continue at line 8 will make the for loop go to its end and process the next file. See the HTML5 part 1 course about the file API for more details (each file has a name, type, lastModificationDate and size attribute. The call to match(…) here is a standard way in JavaScript to match a string value with a regular expression).
At line 19, we insert the <img> element that was created and initialized with the dataURL of the image file, into the HTML list with an id of “list”.
So, let’s add this method to our code example, to display file details once dropped, and also add an <output id=”list”></output> to the HTML of this example.
Complete example of drag and drop + thumbnails of images
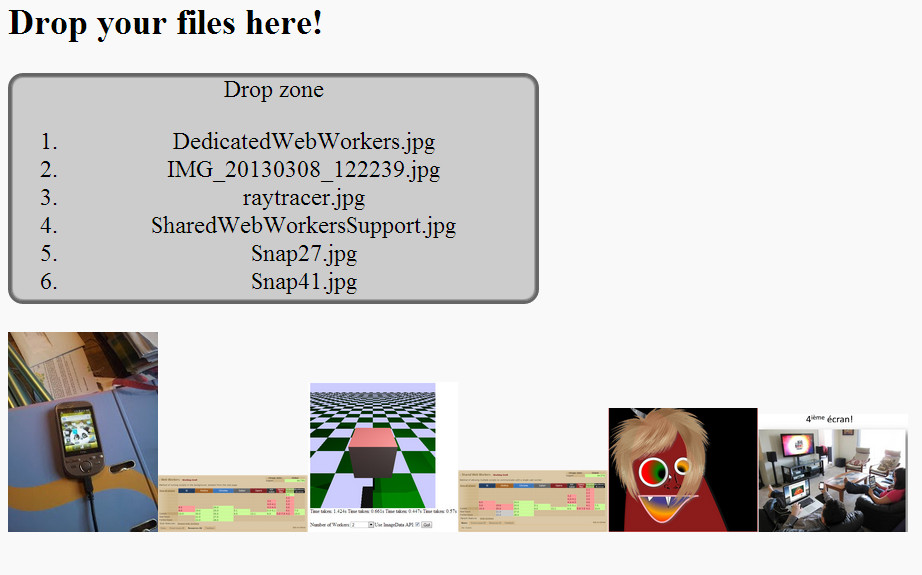
Try it below in your browser (drag’n’drop image files into the drop zone) or play with it at CodePen:
Complete source code:
- <!DOCTYPE html>
- <html lang=”en”>
- <head>
- <style>
- div {
- height: 150px;
- width: 350px;
- border: 2px solid #666666;
- background–color: #ccc;
- margin–right: 5px;
- border–radius: 10px;
- box–shadow: inset 0 0 3px #000;
- text–align: center;
- cursor: move;
- }
- .dragged {
- border: 2px dashed #000;
- background–color: green;
- }
- .draggedOver {
- border: 2px dashed #000;
- background–color: green;
- }
- </style>
- function dragLeaveHandler(event) {
- console.log(“drag leave”);
- // Set style of drop zone to default
- event.target.classList.remove(‘draggedOver’);
- }
- function dragEnterHandler(event) {
- console.log(“Drag enter”);
- // Show some visual feedback
- event.target.classList.add(‘draggedOver’);
- }
- function dragOverHandler(event) {
- //console.log(“Drag over a droppable zone”);
- // Do not propagate the event
- event.stopPropagation();
- // Prevent default behavior, in particular when we drop images or links
- event.preventDefault();
- }
- function dropHandler(event) {
- console.log(‘drop event’);
- // Do not propagate the event
- event.stopPropagation();
- // Prevent default behavior, in particular when we drop images or links
- event.preventDefault();
- // reset the visual look of the drop zone to default
- event.target.classList.remove(‘draggedOver’);
- // get the files from the clipboard
- var files = event.dataTransfer.files;
- var filesLen = files.length;
- var filenames = “”;
- // iterate on the files, get details using the file API
- // Display file names in a list.
- for(var i = 0 ; i filesLen ; i++) {
- filenames += ‘\n’ + files[i].name;
- // Create a li, set its value to a file name, add it to the ol
- var li = document.createElement(‘li’);
- li.textContent = files[i].name;
- document.querySelector(“#droppedFiles”).appendChild(li);
- }
- console.log(files.length + ‘ file(s) have been dropped:\n’ + filenames);
- readFilesAndDisplayPreview(files);
- }
- function readFilesAndDisplayPreview(files) {
- // Loop through the FileList and render image files as thumbnails.
- for (var i = 0, f; f = files[i]; i++) {
- // Only process image files.
- if (!f.type.match(‘image.*’)) {
- continue;
- }
- var reader = new FileReader();
- //capture the file information.
- reader.onload = function(e) {
- // Render thumbnail.
- var span = document.createElement(‘span’);
- span.innerHTML = “
+ e.target.result + “‘/>”;
- document.getElementById(‘list’).insertBefore(span, null);
- };
- // Read the image file as a data URL. Will trigger the call to the above callback when
- // the image file is completely loaded
- reader.readAsDataURL(f);
- }
- }
- </head>
- <body>
- <h2>Drop your files here!</h2>
- id=“droppableZone” ondragenter=“dragEnterHandler(event)“ ondrop=“dropHandler(event)“
- ondragover=“dragOverHandler(event)“ ondragleave=“dragLeaveHandler(event)“>
- Drop zone
- id=“droppedFiles”>
- <br/>
- <output id=“list”></output>
- <body>
- <html>
Above, we added the readFilesAndDisplayPreview() method detailed earlier. We called it at the end of the drop handler (line 77), and we added the <output> element as a container for the <img> elements (constructed by the JavaScript code lines 94-96) which will display the thumbnails (line 114).
