Ajax and binary files – downloading files and monitoring progress
HTTP is a text based protocol, so when you upload/download images, videos or any binary file, they must first be text encoded for transmission, then decoded on-the-fly upon receipt by the server or browser. For a long time, when using Ajax, these binary files had to be decoded “by hand”, using JavaScript code. Not recommended!
We won’t go into too much detail here, but recent browsers (> 2012) usually support XHR2. XHR2 adds the option to directly download binary data. With XHR2, you can ask the browser to encode/decode the file you send/receive, natively. To do this, when you use XMLHttpRequest to send or receive a file, you must set the xhr.responseType as arrayBuffer.
Below is a function that loads a sound sample using XMLHttpRequest level 2.
Note: 1) the simple and concise syntax, and 2) the use of the new arrayBuffer type for the expected response (line 5):
- // Load a binary file from a URL as an ArrayBuffer.
- function loadSoundFile(url) {
- var xhr = new XMLHttpRequest();
- xhr.open(‘GET’, url, true);
- xhr.responseType = ‘arraybuffer’; // THIS IS NEW WITH HTML5!
- xhr.onload = function(e) {
- initSound(this.response); // this.response is an ArrayBuffer.
- };
- xhr.send();
- }
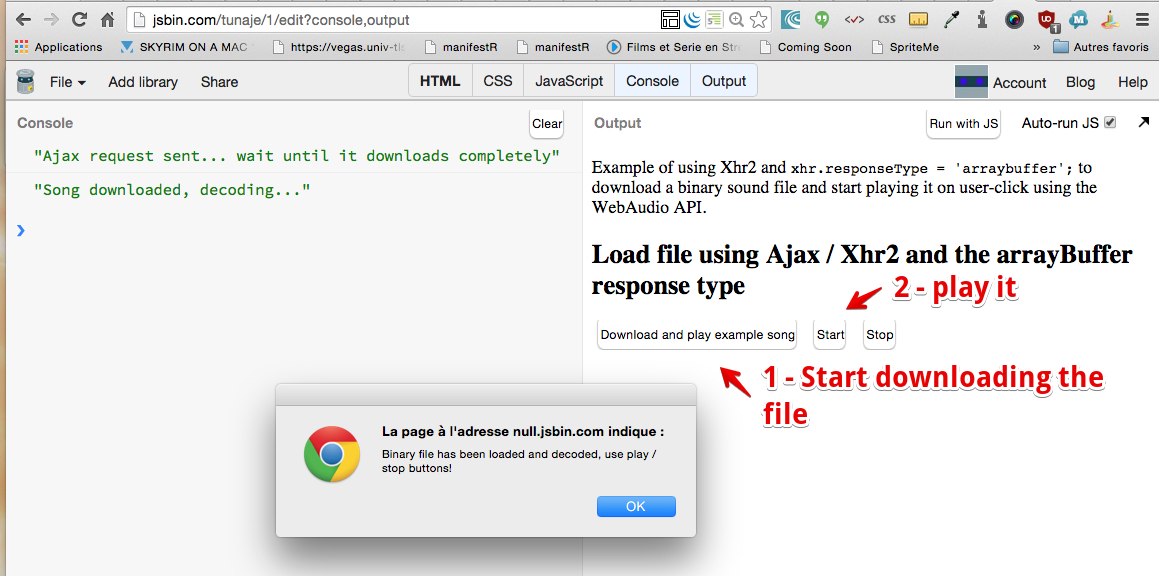
Example: download a binary song file using XHR2 and responseType=’arraybuffer’, and play it using Web Audio
The above function is used, and we modified an example from the HTML5 part 1 course that shows how to read a binary file from disk using the File API’s method readAsArrayBuffer. In this example, instead of reading the file from disk, we download it using XHR2.
Complete source code:
- <!DOCTYPE html>
- <html lang=“en”>
- <head>
- <title>XHR2 and binary files + Web Audio API</title>
- </head>
- <body>
- <p>Example of using XHR2 and <code>xhr.responseType = ‘arraybuffer’;</code> to download a binary sound file
- and start playing it on user-click using the Web Audio API.</p>
- <p>
- <h2>Load file using Ajax/XHR2 and the arrayBuffer response type</h2>
- <button onclick=“downloadSoundFile(‘http://myserver.com/song.mp3’);“>
- Download and play example song.
- </button>
- <button onclick=“playSound()“ disabled>Start</button>
- <button onclick=“stopSound()“ disabled>Stop</button>
- // WebAudio context
- var context = new window.AudioContext();
- var source = null;
- var audioBuffer = null;
- function stopSound() {
- if (source) {
- source.stop();
- }
- }
- function playSound() {
- // Build a source node for the audio graph
- source = context.createBufferSource();
- source.buffer = audioBuffer;
- source.loop = false;
- // connect to the speakers
- source.connect(context.destination);
- source.start(0); // Play immediately.
- }
- function initSound(audioFile) {
- // The audio file may be an mp3 – we must decode it before playing it from memory
- context.decodeAudioData(audioFile, function(buffer) {
- console.log(“Song decoded!”);
- // audioBuffer the decoded audio file we’re going to work with
- audioBuffer = buffer;
- // Enable all buttons once the audio file is
- // decoded
- var buttons = document.querySelectorAll(‘button’);
- buttons[1].disabled = false; // play
- buttons[2].disabled = false; // stop
- alert(“Binary file has been loaded and decoded, use play / stop buttons!”)
- }, function(e) {
- console.log(‘Error decoding file’, e);
- });
- }
- // Load a binary file from a URL as an ArrayBuffer.
- function downloadSoundFile(url) {
- var xhr = new XMLHttpRequest();
- xhr.open(‘GET’, url, true);
- xhr.responseType = ‘arraybuffer’; // THIS IS NEW WITH HTML5!
- xhr.onload = function(e) {
- console.log(“Song downloaded, decoding…”);
- initSound(this.response); // this.response is an ArrayBuffer.
- };
- xhr.onerror = function(e) {
- console.log(“error downloading file”);
- }
- xhr.send();
- console.log(“Ajax request sent… wait until it downloads completely”);
- }
- </body>
- </html>
Explanations:
- Line 12: a click on this button will call the downloadSoundFile function, passing it the URL of a sample mp3 file.
- Lines 58-73: this function sends the Ajax request, and when the file has arrived, the xhr.onload callback is called (line 63).
- Lines 39-55: The initSound function decodes the mp3 into memory using the WebAudio API, and enables the play and stop buttons.
- When the play button is enabled and clicked (line 15) it calls the playSound function. This builds a minimal Web Audio graph with a BufferSource node that contains the decoded sound (lines 31-32), connects it to the speakers (line 35), and then plays it.
Monitoring uploads or downloads using a progress event

1 – Declare a progress event handler
XHR2 now provides progress event attributes for monitoring data transfers. Previous implementations of XmlHttpRequest didn’t tell us anything about how much data has been sent or received. The ProgressEvent interface adds 7 events relating to uploading or downloading files.
| attribute | type | Explanation |
|---|---|---|
onloadstart |
loadstart |
When the request starts. |
onprogress |
progress |
While loading and sending data. |
onabort |
abort |
When the request has been aborted, either by invoking the abort() method or navigating away from the page. |
onerror |
error |
When the request has failed. |
onload |
load |
When the request has successfully completed. |
ontimeout |
timeout |
When the author specified timeout has passed before the request could complete. |
onloadend |
loadend |
When the request has completed, regardless of whether or not it was successful. |
The syntax for declaring progress event handlers is slightly different depending on the type of operation: a download (using the GET HTTP method), or an upload (using POST).
Syntax for download:
- var xhr = new XMLHttpRequest();
- xhr.open(‘GET’, url, true);
- …
- xhr.onprogress = function(e) {
- // do something
- }
- xhr.send();
Note that an alternative syntax such as xhr.addEventListener(‘progress’, callback, false) also works.
Syntax for upload:
- var xhr = new XMLHttpRequest();
- xhr.open(‘POST’, url, true);
- …
- xhr.upload.onprogress = function(e) {
- // do something
- }
- xhr.send();
Notice that the only difference is the “upload” added after the name of the request object: with GET we use xhr.onprogress and with POST we use xhr.upload.onprogress.
Note that an alternative syntax such as xhr.upload.addEventListener(‘progress’, callback, false) also works.
2 – Get progress values (how many bytes have been downloaded) and the total file size
The event e passed to the onprogress callback has two pertinent properties:
- loaded which corresponds to the number of bytes that have been downloaded or uploaded by the browser, so far, and
- total which contains the file’s size (in bytes).
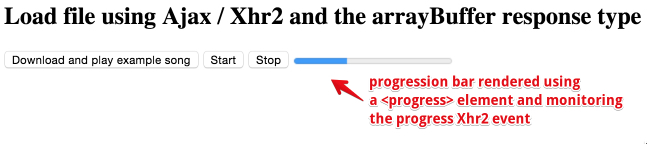
Combining these with a <progress> element, makes it very easy to render an animated progress bar. Here is a source code extract that does this for a download operation:
HTML:
- <progress id=“downloadProgress” value=0><progress>
JavaScript:
- // progress element
- var progress = document.querySelector(‘#downloadProgress’);
- function downloadSoundFile(url) {
- var xhr = new XMLHttpRequest();
- xhr.open(‘GET’, url, true);
- …
- xhr.onprogress = function(e) {
- progress.value = e.loaded;
- progress.max = e.total;
- }
- xhr.send();
- }
Explanations: by setting the value and max attributes of the <progress> element with the current number of bytes downloaded by the browser and the total size of the file (lines 10-11), it will reflect the actual proportions of the file downloaded/still to come.
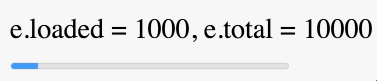
For example, with a file that is 10,000 bytes long, if the current number of bytes downloaded is 1000, then <progress value=1000 max=10000> will look like this:
And a current download of 2000 bytes will define <progress value=2000 max=10000> and will look like this:
![]()
Complete example: monitoring the download of a song file
This is a variant of the previous example that uses the progress event and a <progress> HTML5 element to display an animated progression bar while the download is going on.
Try it on JSBin – look at the code, which includes the previous source code extract.
