Splitting the game into several JavaScript files
Introduction
JSBin is a great tool for sharing code, for experimenting, etc. But as soon as the size of your project increases, you’ll find that the tool is not suited for developing large systems.
In order to keep working on this game framework, we recommend that you modularize the project and split the JavaScript code into several JavaScript files:
- Review the different functions and isolate those that have no dependence on the framework. Obviously, the sprite utility functions, the collision detection functions, and the ball constructor function can be separated from the game framework, and could easily be reused in other projects. Key and mouse listeners also can be isolated, gamepad code too…
- Look at what you could change to reduce dependencies: add a parameter in order to make a function independent from global variables, for example.
- In the end, try to limit the game.js file to the core of the game framework (init function, mainloop, game states, score, levels), and separate the rest into functional groupings, eg utils.js, sprites.js, collision.js, listeners.js, etc.
Let’s do this together!
Start with a simple structure
First, create a game.html file that contains the actual HTML code:
game.html:
- <!DOCTYPE html>
- <html lang=“en”>
- <head>
- <meta charset=“utf-8”>
- <title>Nearly a real game</title>
- <!– External JS libs –>
- src=“https://cdnjs.cloudflare.com/ajax/libs/howler/1.1.25/howler.min.js”>
- <!– CSS files for your game –>
- <link rel=”stylesheet” href=”css/game.css”>
- <!– Include here all game JS files–>
- http://js/game.js
- </head>
- <body>
- <canvas id=“myCanvas” width=“400” height=“400”></canvas>
- </body>
- </html>
Here is the game.css file (very simple):
- canvas {
- border: 1px solid black;
- }
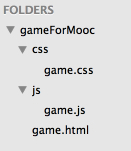
If you remember all the way back to the HTML5.0 course, a development project structure was proposed to help you organise multiple files by directory and sub-directories (“folders” if you are an MS-Windows user). So let’s take the JavaScript code from the last JSBin example, save it to a file called game.js, and locate it in a subdirectory js under the directory where the game.html file is located. Similarly we’ll keep the CSS file in a css subdirectory:
Try the game: open the game.html file in your browser. If the game does not work, open devtools, look at the console, fix the errors, try again, etc. You may have to do this several times when you split your files and encounter errors.
Isolate the ball function constructor
Put the Ball constructor function in a js/ball.js file, include it in the game.html file, and try the game: oops, it doesn’t work! Let’s open the console:
Ball.js:
- // constructor function for balls
- function Ball(x, y, angle, v, diameter) {
- …
- this.draw = function () {
- ctx.save();
- …
- };
- this.move = function () {
- …
- this.x += calcDistanceToMove(delta, incX);
- this.y += calcDistanceToMove(delta, incY);
- };
- }
We need to isolate the time based animation functions into a separate file
Hmmm… the calcDistanceToMove function is used here, but is defined in the game.js file, inside the GF object and will certainly raise an error… Also, the ctx variable should be added as a parameter to the draw method, otherwise it won’t be recognized…
Just for fun, let’s try the game without fixing this, and look at the devtools console:

Aha! The calcDistanceToMove function is indeed used by the Ball constructor in ball.js at line 27 (it moves the ball using time-based animation). If you look carefully, you will see that it’s also used for moving the monster, etc. In fact, there are parts in the game framework related to time-based animation. Let’s move them all into a timeBasedAnim.js file!!
Fix: extract the utility functions related to time-based animation and add a ctx parameter to the draw method of ball.js. Don’t forget to add it in game.js where ball.draw() is called. The call should be now ball.draw(ctx); instead of ball.draw() without any parameter.
timeBasedAnim.js:
- var delta, oldTime = 0;
- function timer(currentTime) {
- var delta = currentTime – oldTime;
- oldTime = currentTime;
- return delta;
- }
- var calcDistanceToMove = function (delta, speed) {
- //console.log(“#delta = ” + delta + ” speed = ” + speed);
- return (speed * delta) / 1000;
- };
Isolate the part that counts the number of frames per second
We need to add a small initFPS function for creating the <div> that displays the FPS value… this function will be called from the GF.start()method. There was code in this start method that has been moved into the initFPS function we created and added into the fps.js file.
fps.js:
- // vars for counting frames/s, used by the measureFPS function
- var frameCount = 0;
- var lastTime;
- var fpsContainer;
- var fps;
- var initFPSCounter = function() {
- // adds a div for displaying the fps value
- fpsContainer = document.createElement(‘div’);
- document.body.appendChild(fpsContainer);
- }
- var measureFPS = function (newTime) {
- // test for the very first invocation
- if (lastTime === undefined) {
- lastTime = newTime;
- return;
- }
- //calculate the difference between last & current frame
- var diffTime = newTime – lastTime;
- if (diffTime >= 1000) {
- fps = frameCount;
- frameCount = 0;
- lastTime = newTime;
- }
- //and display it in an element we appended to the
- // document in the start() function
- fpsContainer.innerHTML = ‘FPS: ‘ + fps;
- frameCount++;
- };
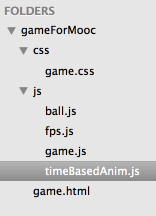
At this stage, the structure looks like this:
Let’s continue and isolate the event listeners
Now, consider the code that creates the listeners, can we move it from the GF.start() method into a listeners.js file? We’ll have to pass the canvas as an extra parameter (to resolve a dependency) and we also move the getMousePos method into there.
listeners.js:
- function addListeners(inputStates, canvas) {
- //add the listener to the main, window object, and update the states
- window.addEventListener(‘keydown’, function (event) {
- if (event.keyCode === 37) {
- inputStates.left = true;
- } else if (event.keyCode === 38) {
- inputStates.up = true;
- } …
- }, false);
- //if the key is released, change the states object
- window.addEventListener(‘keyup’, function (event) {
- …
- }, false);
- // Mouse event listeners
- canvas.addEventListener(‘mousemove’, function (evt) {
- inputStates.mousePos = getMousePos(evt, canvas);
- }, false);
- …
- }
- function getMousePos(evt, canvas) {
- …
- }
Isolate the collision tests
Following the same idea, let’s put these into a collisions.js file:
- // We can add the other collision functions seen in the
- // course here…
- // Collisions between rectangle and circle
- function circRectsOverlap(x0, y0, w0, h0, cx, cy, r) {
- …
- }
- function testCollisionWithWalls(ball, w, h) {
- …
- }
We added the width and height of the canvas as parameters to the testCollisionWithWalls function to resolve dependencies. The other collision functions (circle-circle and rectangle-rectangle) presented during the course, could be put into this file as well.
Final downloadable version and conclusion
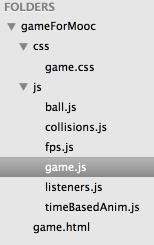
After all that, we reach this tidy structure:
Final game.html file:
- <!DOCTYPE html>
- <html lang=“en”>
- <head>
- <meta charset=“utf-8”>
- <title>Nearly a real game</title>
- <link rel=“stylesheet” href=“css/game.css”>
- src=“https://cdnjs.cloudflare.com/ajax/libs/howler/1.1.25/howler.min.js”>
- <!– Include here all JS files –>
- src=“js/game.js”>
- src=“js/ball.js”>
- src=“js/timeBasedAnim.js”>
- src=“js/fps.js”>
- src=“js/listeners.js”>
- src=“js/collisions.js”>
- </head>
- <body>
- <canvas id=“myCanvas” width=“400” height=“400”></canvas>
- </body>
- </html>
We could go further by defining a monster.js file, turning all the code related to the monster/player into a well-formed object, with draw and move methods, etc. There are many potential improvements you could make. JavaScript experts are welcome to make a much fancier version of this little game 🙂
Download the zip for this version, just open the game.html file in your browser!
Our intent this week was to show you the primary techniques/approaches for dealing with animation, interactions, collisions, managing with game states, etc.
The quizzes for this week are not so important. We’re keen to see you write your own game – you can freely re-use the examples presented during lectures and modify them, improve the code structure, playability, add sounds, better graphics, more levels, etc. We like to give points for style and flair, but most especially because we’ve been (pleasantly) surprised!
