Introduction to the Web Audio API
Shortcomings of the standard APIs that we have discussed so far…
In week 2 of the HTML 5 Coding Essentials course, you learned how to add an audio or video player to an HTML document, using the <audio>and <video> elements.
For example:
Would render like this in your document:
Under the hood, this HTML code:
- initiates a network request to stream the content,
- deals with decoding/streaming/buffering the incoming data,
- renders audio controls,
- updates the progress indicator, time, etc.
You also learned that it’s possible to write a custom player: to make your own controls and use the JavaScript API of the <audio> and <video>elements; to call play() and pause(); to read/write properties such as currentTime; to listen to events (ended, error, timeupdate, etc.); and to manage a playlist, etc.
However, there are many things we still cannot do, including:
- Play multiple sounds or music in perfect sync,
- Play non-streamed sounds (this is a requirement for games: sounds must be loaded in memory),
- Output directly to the speakers; adding special effects, equalizer, stereo balancing, reverb, etc.
- Any fancy visualizations that dance with the music (e.g. waveforms and frequencies).
The Web Audio API will fulfill such missing parts, and much more.
In this course, we will not cover the whole Web Audio API specification. Instead, we focus on the parts of the API that can be useful for writing enhanced multimedia players (that work with streamed audio or video), and on parts that will be useful for games (i.e. parts that work with small sound samples loaded in memory). There is a whole part of the API that specializes in music synthesis and scheduling notes, that will not be covered here.
Here’s a screenshot from one example we will study: an audio player with animated waveform and volume meters that ‘dance’ with the music:
Web Audio concepts
The audio context
The canvas used a graphic context for drawing shapes and handling properties such as colors and line widths.
The Web Audio API takes a similar approach, using an AudioContext for all its operations.
Using this context, the first thing we’ll do when using this API is to build an “audio routing graph” made of “audio nodes” which are linked together (most of the time in the course, we will call it the “audio graph”). Some node types are for “audio sources”, another built-in node is for the speakers, and many other types exist, that correspond to audio effects (delay, reverb, filter, stereo panner, etc.), audio analysis (useful for creating fancy visualizations of the real time signal). Others, which are specialized for music synthesis, will not be covered in this course.
The AudioContext also exposes various properties, such as sampleRate, currentTime (in seconds, from the start of AudioContext creation), destination, and the methods for creating each of the various audio nodes.
The easiest way to understand this principle is to look at a first example at JSBin.
This example will be detailed in the next lesson. For the moment, all you need to know is that it routes the signal from an <audio> element using a special node that bridges the “streamed audio” world to the Web Audio World, called a MediaElementSourceNode, then this node is connected to a GainNode which enables volume control. This node is then connected to the speakers. We can look at the audio graph of this application using a recent version of FireFox. This browser is the only one (as at November 2015) to provide a view of the audio graph, which is very useful for debugging:
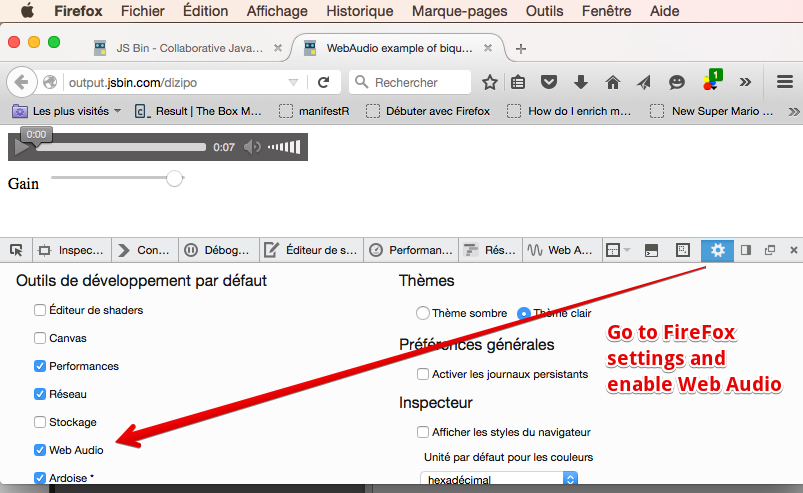
Step 1 – enable Web Audio debug in the devtools
To enable the Web Audio Editor, open up the options in the Developer Tools (function key F12 then the gear-wheel), and check the “Web Audio” (Editor) option. Once enabled, return to Developer Tools and open the Web Audio tab. Then reload the target web-page so that all web audio activity can be monitored by the tool.
Step 2 : Open the JSBin example in standalone mode (not in editor mode)
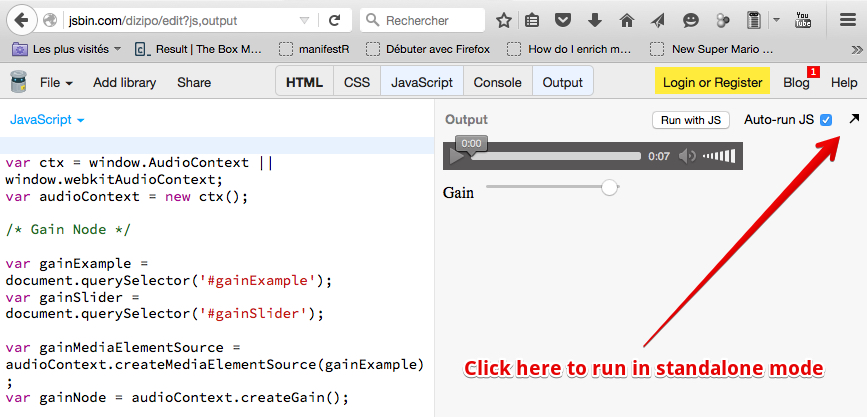
Step 3 – open the devtools and go to the Web Audio tab, reload the page if needed
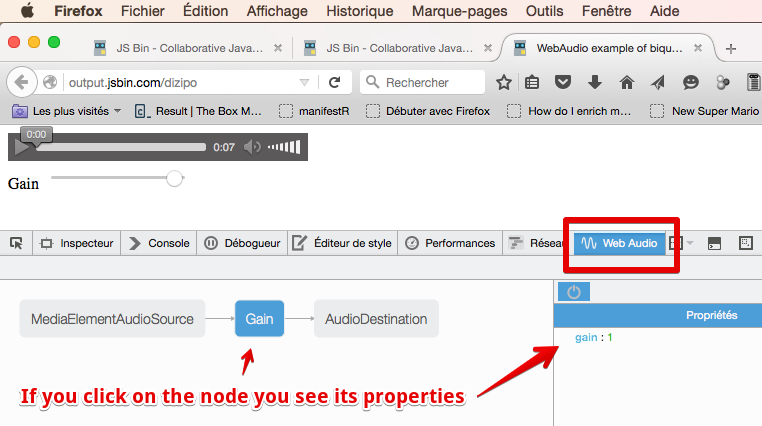
Audio nodes are linked via their inputs and outputs, forming a chain that starts with one or more sources, goes through one or more nodes, then ends up at a destination (although you don’t have to provide a destination if you just want to visualize some audio data, for example).
The AudioDestination node above corresponds to the speakers. In this example the signal goes from left to right: from the MediaElementSourceNode (we will see in the code that it’s the audio stream from an <audio> element), to a Gain node (and by adjusting the gain property we can set the volume of the sound that outputs from this node), then to the speakers.
Typical code to build an audio routing graph (the one used in the above example)
HTML code extract:
- <audio src=”https://mainline.i3s.unice.fr/mooc/drums.mp3″
- id=”gainExample”
- controls loop
- crossorigin=”anonymous”>
- </audio>
- <br>
- <label for=”gainSlider”>Gain</label>
- <input type=”range” min=”0″ max=”1″ step=”0.01″ value=”1″ id=”gainSlider” />
JavaScript source code:
- // This line is a trick to initialize the AudioContext
- // that will work on all recent browsers
- var ctx = window.AudioContext || window.webkitAudioContext;
- var audioContext;
- var gainExemple, gainSlider, gainNode;
- window.onload = function() {
- // get the AudioContext
- audioContext = new ctx();
- // the audio element
- gainExample = document.querySelector(‘#gainExample’);
- gainSlider = document.querySelector(‘#gainSlider’);
- buildAudioGraph();
- // input listener on the gain slider
- gainSlider.oninput = function(evt){
- gainNode.gain.value = evt.target.value;
- };
- };
- function buildAudioGraph() {
- // create source and gain node
- var gainMediaElementSource = audioContext.createMediaElementSource(gainExample);
- gainNode = audioContext.createGain();
- // connect nodes together
- gainMediaElementSource.connect(gainNode);
- gainNode.connect(audioContext.destination);
- }
Explanations:
Here we applied a commonly used technique:
- As soon as the page is loaded: initialize the audio context (line 11). Here we use a trick so that the code works on all browsers: Chrome, FF, Opera, Safari, Edge. The trick at line 3 is required for Safari, as it still needs the WebKit prefixed version of the AudioContext constructor.
- Then we build a graph (line 17).
- The build graph function first builds the nodes, then connects them to build the audio graph. Notice the use of audioContext.destination for the speakers (line 32). This is a built-in node. Also, the MediaElementSource node “gainexample” which is the HTML’s audio element.
External resource
Example of bigger graphs
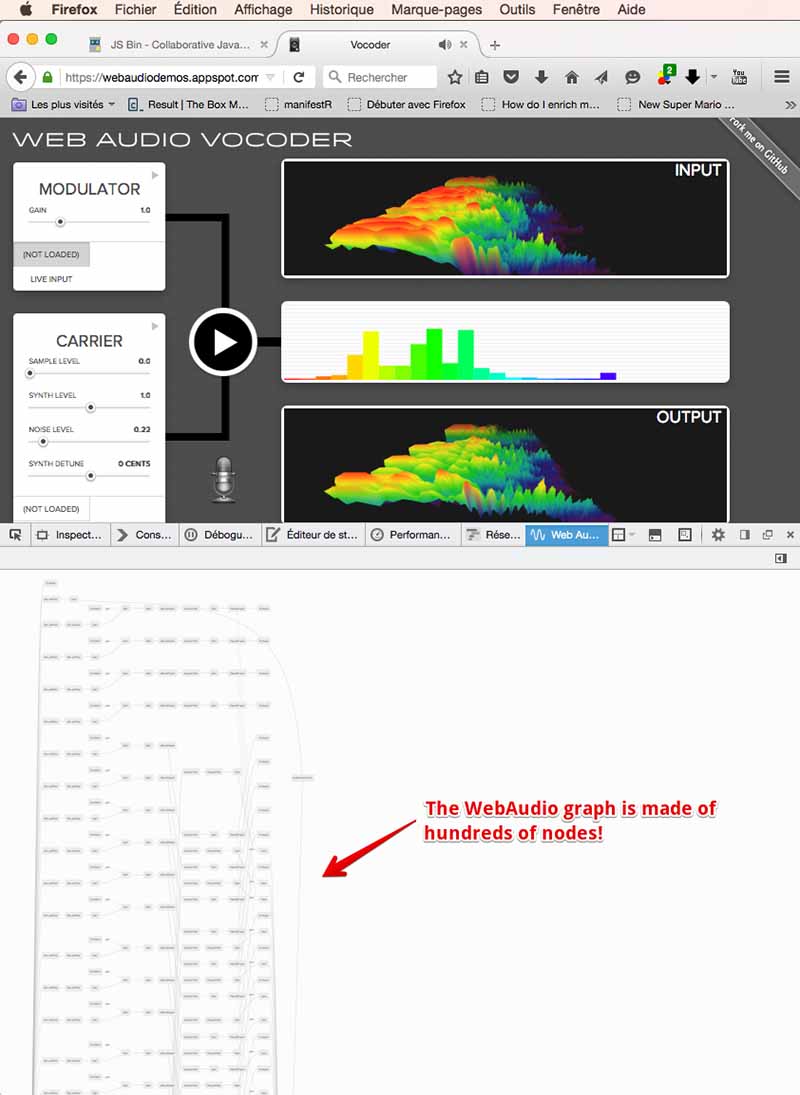
Web Audio nodes are implemented natively in the browser. The Web Audio framework has been designed to handle a very large number of nodes. It’s common to encounter applications with several dozens of nodes: some, such as this vocoder app, use hundreds of nodes: